


Messaging
In the Web App, seamless communication is facilitated through the messaging feature, allowing users to interact with team members both individually and within groups. This article provides a comprehensive guide to effectively utilizing the messaging capabilities.
Send message
Log into your account.
On the left menu, access Directory.
Search for the contact or group you would like to send a message to. Click on it.
On the chat page, use the whiteboard to write or message.
Either click the "Send" button or tap "Enter" on the keyboard to send the message.
Use the tools to highlight your messages. (optional)
Edit messages: Simply hover over your message, click "Edit" when the ellipsis appears, and modify your message.
Delete messages: Simply hover over your message, click "Delete" when the ellipsis appears. Confirm your actions by clicking on "Delete".
The messages you send or receive will be shown along with the date and time of the message.
Sending Attachments
Enhance your communication by easily sharing attachments with your contacts.
Click on the attachment icon in the top left corner to select files from your computer. You can also paste or drag and drop the files.
Once the files have loaded, and the send button becomes available, simply click "send'.
Important!
Maximum Number of Files: Please be aware that you can send up to 10 files in a single instance.
File Sizes: Each attached file must be smaller than 20MB. Files larger than this limit cannot be accepted.
Deleting Attachments
You have the ability to delete attachments while composing messages as well as after they have been sent. Please note that only the sender of the message can delete them.
Delete attachments while composing a message: To remove attachments while composing a message, hover your mouse over the file in the attachment list. Click on the "Trash" icon, then confirm by clicking "Delete" in the dialog box.
Delete attachments after they have been sent: Hover your mouse over it to reveal the three dots. Click on them and then select the attachment file you wish to delete. Please note that once a file is deleted after being sent, there is no way to retrieve it.
Receiving Message
To ensure you receive messages promptly, adhere to these guidelines:
a. Notification Permissions: Allow notifications within your browser settings to receive real-time updates.
b. Offline Messages: Even if you are offline when a message arrives, a notification will alert you upon reconnection, preventing any missed communication's. Recognizing Message Senders: When someone's typing to send you a message, their avatar switches to chat **bubbles (...)** in the sidebar.
d. Downloading attachments: When you receive a file, simply hover your mouse cursor over it. A download icon will be displayed. Click on the download icon to initiate the file download process. The file will then be downloaded to your device, allowing you to access it at your convenience.
Create new Groups
When creating a group, it is now possible to add a name to the group, although this is optional.
On the sidebar, click on the Add new Group button within group section.
Click on Add to add members to yout group or use the search tool to search for members.
Before the group is officially created, the owner has the ability to remove participants from the group's list. Hover your mouse and click on the icon to remove the user from tour group.
A group must consist of at least three members, including yourself (owner) and two others.
Optionally, assign a name to your group. Click on "Create Group" and you will be redirected to the Chat Group Page.
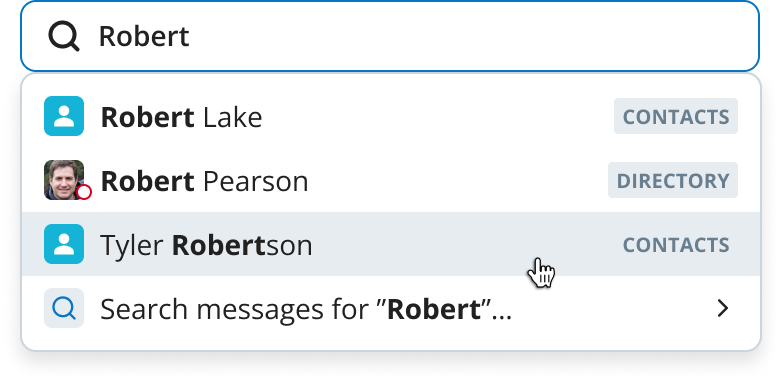
Search in Web App
Whether you're seeking contacts or specific messages, follow these steps to locate them efficiently:
Navigate to the Main Page and locate the Search bar.
Enter the information you're searching for in the designated field.
If you're searching for a contact, simply click on their name. For messages, select "Search messages for..."
On the Search Results Page, find and click on the specific message you're interested in. This action will direct you to the Contact Chat Page.
 Favorite Contacts and Groups
By marking specific contacts as favorites, you can easily distinguish key interactions.
a. Mark as Favorite: On the chat page's header, locate the star icon alongside "Favorite" and click on it. The selected contact will then appear in the "Starred" section of the left menu.
b. Removing from Favorites: Should the need arise to remove a contact from your favorites, simply click on the "Favorite" icon again.
Share